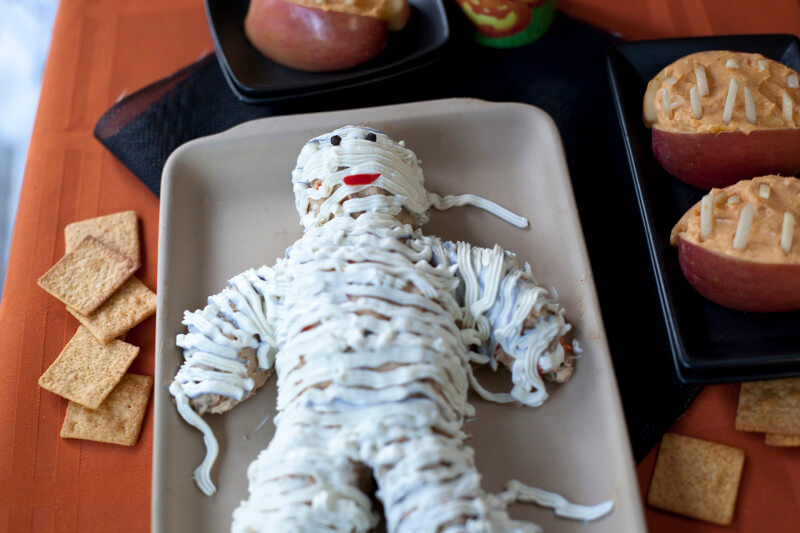
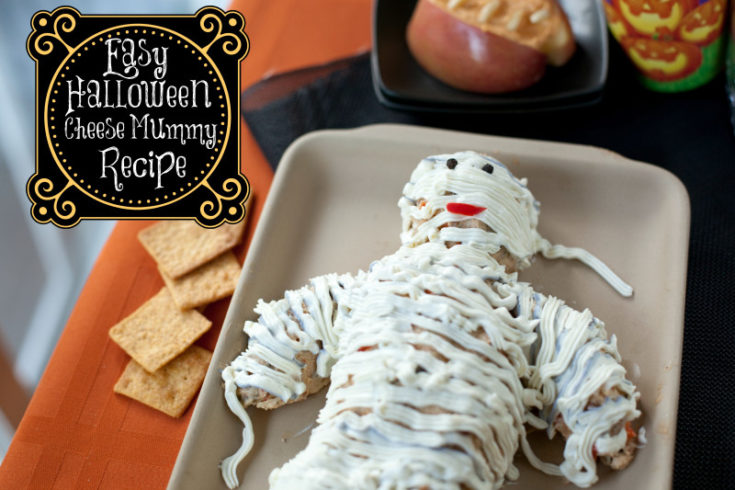
If you want a cute Halloween party food, you have to try this cheese ball mummy. The body is a homemade cheese ball packed with flavor from ingredients like bacon, roasted red pepper, parsley, and almonds. The bandages are cream cheese piped on with a basket weave frosting tip.

This cheese mummy recipe was originally posted in 2010. We’ve polished it up a bit and are sharing it again in October 2020 with better instructions, step by step photos, and a video! This post also contains affiliate links which means we get a small commission from anything you buy through the links.
Why you should make this cheese ball mummy
Well first of all, isn’t he the cutest cheese ball mummy ever? Whether you’re looking for a Halloween recipe for kids or for adults, he’s your guy!
This easy cheeseball really is the perfect Halloween appetizer and makes a stunning contribution to any Halloween potluck.

The little mummy is almost all cheese, and looks so impressive people might be afraid to eat him. But once you dig in, no one will be able to resist.
He’ll be gone faster than you can say “King Tutankhamun”. Or something like that…
This cheese ball mummy has been tested over a dozen times!
But the main reason you should give this cute edible mummy a try is that I’ve been making him for 13 years now. So I know this recipe works!
I first made my cheese ball mummy using store bought cheese logs because I didn’t yet know about cheese balls (I don’t think I ever had one in living in Hawaii!). The mummy was cute but I wasn’t thrilled with the taste.
I began experimenting with different cheese ingredients to make my own cheese logs, discovered the world of cheese balls, and am now obsessed and make them for every holiday.
I’ve got a Christmas cheese ball snowman, a Thanksgiving cheese ball turkey, and an amazing copycat Boursin recipe.

Easy to make even if you aren’t artistic
Now if you’re looking for easy Halloween food ideas you might think this looks too difficult, but it’s not! This cheese mummy recipe has a few steps to it, but with a stand mixer you can whip the cheese ball part up in minutes.
Don’t let the bandages overwhelm you either, they’re really simple to make.
You don’t have to have a steady hand (like for icing a cake) because no mummy has perfect straight bandages. I do NOT have steady hands. If I’m not using a speedy setting on my camera it’s glued to the tripod.

This has sadly prevented my cake decorating dreams, but cheese mummy bandages I can handle like a pro!
Let me walk you through the supplies and recipe step by step. You can also watch the video in the recipe card where I make the whole Halloween cheese ball with you!
How to make a Halloween cheese ball mummy

For the equipment, I love using my stand mixer, but you can mix these by hand. It just takes a little more time and effort.
The only specialty items you really need for this cheeseball mummy are a pastry bag and a flat or basket weave cake decorating tip (In the kit I linked to, the basket weave tip is #48).
If you already have bags and couplers you can also buy just the basket weave tip. Honestly, you don’t even need specialty pastry bags. In the Cheese Ball Mummy video you’ll see I snip the corner off a food storage bag.
Ingredients
- 2 cups Swiss or Monterey Jack cheese, finely shredded
- 2 cups sharp cheddar cheese, finely shredded
- 1 cup cream cheese or goat cheese, softened 8 ounces
- 1/2 cup light sour cream (I like this texture better for the cheese ball, but regular is fine too)
- 1/2 yellow onion finely minced
- 1/4 cup chopped roasted red pepper
- 1/4 cup crumbled or chopped cooked bacon
- 1/4 cup chopped fresh Italian parsley
- 1/4 cup sliced almonds
DECORATIONS
- 1 cup cream cheese, softened (8 ounces)
- 3 Tablespoons milk
- Black food dye (optional)
- 2 peppercorns
- sliver of roasted red pepper
Instructions
- Use a stand mixer to beat one cup of cream cheese and sour cream until fluffy.

2. Add the swiss and cheddar cheeses, onion, roasted pepper, bacon, parsley, and nuts. Beat on medium speed until well mixed.

3. Refrigerate the cheese mixture until firm (about 1 hour) You can actually skip this step to save time, but the cheese ball mummy will be pretty sticky when you shape him. Wearing food prep gloves can help.
4. Shape cheese ball into a body on a pan or cookie sheet.

5. Mix the second cup of cream cheese and milk. Spoon into a pastry bag with a flat or basket weave tip and pipe bandages onto the mummy body.

(OPTIONAL) If you would like to do the “dirty bandages”, pull out a tablespoon of cream cheese “frosting” and dye it a light gray. Smear that in a line up your pastry bag before adding in the white cream cheese. Then pipe bandages onto your mummy.

6. Use peppercorns and red pepper to make eyes and a mouth.

7. Refrigerate until 30 minutes before serving. Serve with crackers and pretzel sticks for scooping, or bread to spread it on. Baby carrots are great too!

Giving your mummy “dirty” bandages
The “dirty” cream cheese bandages are completely optional, but a fun way to easily give some depth to your Halloween cheese ball mummy bandages.
You just need a little gray or black food coloring. Mix the food coloring with a small amount of your cream cheese and spread it up one side of the bag.
In the video, using a little on a toothpick wasn’t enough, so I tried to pour in just a drop and added way to much. I recommend paste or gel food dye over the liquid I used in the video. It’s a lot easier to get the right amount that way.
But it’s a fun technique. Try and pipe it so the gray ends up on the bottom half of the bandages to look a little like a shadow. This is a tip I got from my sister who is an amazing cookie decorator.

If you love mummies, you have to try our Halloween pizza mummy recipe. We also have ghost bananas, fruit spiders, protein ball spiders, pumpkin rice krispie treats, and so many more Halloween food ideas. What’s your favorite Halloween party food?
Thanks for supporting this site!
By clicking one of these links before making a purchase on Amazon, we get a small percentage of your purchase, without it costing you anything extra! Thanks for helping to support our family business.
Pin to Save for Later
Don’t lose this recipe! Pin the image below and then leave a photo in the comments of the pin when you make it. We love seeing your creations!

Halloween Cheese Ball Mummy Printable Recipe
serves 20
Yield: 1 mummy
Cheese Mummy: The Best Halloween Potluck Recipe

This cute cheese mummy is surprisingly easy to make and the perfect savory treat for your Halloween party. The light cream cheese is for texture, not cutting calories, but it will still work with regular sour cream.
Prep Time
1 hour 25 minutes
Total Time
1 hour 25 minutes
Ingredients
-
2 cups Swiss or Monterey Jack cheese, finely shredded
-
2 cups sharp cheddar cheese, finely shredded
-
1 cup cream cheese or goat cheese, softened 8 ounces
-
1/2 cup light sour cream
-
1/2 yellow onion finely minced
-
1/4 cup chopped roasted red pepper
-
1/4 cup crumbled or chopped cooked bacon
-
1/4 cup chopped fresh Italian parsley
-
1/4 cup sliced almonds
Decorations
-
1 cup cream cheese, softened (8ounces)
-
3 Tablespoons milk
-
Black food dye (optional)
-
2 peppercorns
-
sliver of roasted red pepper
Instructions
- Use a stand mixer to beat one cup of cream cheese and sour cream until fluffy.
- Add the swiss and cheddar cheeses, onion, roasted pepper, bacon, parsley, and nuts. Beat on medium speed until well mixed.
- Refrigerate the cheese mixture until firm (about 1 hour).
- Shape cheese ball into a body on a pan or cookie sheet.
- Mix the second cup of cream cheese and milk. Spoon into a pastry bag with a flat or basket weave tip and pipe bandages onto the mummy body.
- (OPTIONAL) If you would like to do the "dirty bandages", pull out a tablespoon of cream cheese "frosting" and dye it a light gray. Smear that in a line up your pastry bag before adding in the white cream cheese. Then pipe bandages onto your mummy.
- Use peppercorns and red pepper to make eyes and a mouth.
- Serve with crackers and pretzel sticks for scooping, or bread to spread it on. Baby carrots are great too!
Notes
Approximate cost/serving: If you buy your cheese in bulk like I do this is really affordable. The whole mummy cost me about $6 to make. If you have other appetizers it easily feeds 20 people, so just 30 cents a serving.
Vegetarian/Gluten free: You can leave out the bacon to make it vegetarian, and it's already gluten free.
Nutrition Information:
Yield:
20
Serving Size:
2 Tablespoons
Amount Per Serving:
Calories: 275Total Fat: 23gSaturated Fat: 13gTrans Fat: 0gUnsaturated Fat: 8gCholesterol: 65mgSodium: 330mgCarbohydrates: 4gFiber: 0gSugar: 1gProtein: 13g
Nutrition information is an estimate only, and is only for the cheese ball mummy. Does not include crackers, bread, carrots, etc. for dipping or spreading.
Cheese Mummy: The Best Halloween Potluck Recipe
This cute cheese mummy is surprisingly easy to make and the perfect savory treat for your Halloween party. The light cream cheese is for texture, not cutting calories, but it will still work with regular sour cream.
Ingredients
- 2 cups Swiss or Monterey Jack cheese, finely shredded
- 2 cups sharp cheddar cheese, finely shredded
- 1 cup cream cheese or goat cheese, softened 8 ounces
- 1/2 cup light sour cream
- 1/2 yellow onion finely minced
- 1/4 cup chopped roasted red pepper
- 1/4 cup crumbled or chopped cooked bacon
- 1/4 cup chopped fresh Italian parsley
- 1/4 cup sliced almonds
Decorations
- 1 cup cream cheese, softened (8ounces)
- 3 Tablespoons milk
- Black food dye (optional)
- 2 peppercorns
- sliver of roasted red pepper
Instructions
- Use a stand mixer to beat one cup of cream cheese and sour cream until fluffy.
- Add the swiss and cheddar cheeses, onion, roasted pepper, bacon, parsley, and nuts. Beat on medium speed until well mixed.
- Refrigerate the cheese mixture until firm (about 1 hour).
- Shape cheese ball into a body on a pan or cookie sheet.
- Mix the second cup of cream cheese and milk. Spoon into a pastry bag with a flat or basket weave tip and pipe bandages onto the mummy body.
- (OPTIONAL) If you would like to do the "dirty bandages", pull out a tablespoon of cream cheese "frosting" and dye it a light gray. Smear that in a line up your pastry bag before adding in the white cream cheese. Then pipe bandages onto your mummy.
- Use peppercorns and red pepper to make eyes and a mouth.
- Serve with crackers and pretzel sticks for scooping, or bread to spread it on. Baby carrots are great too!
Notes
Approximate cost/serving: If you buy your cheese in bulk like I do this is really affordable. The whole mummy cost me about $6 to make. If you have other appetizers it easily feeds 20 people, so just 30 cents a serving.
Vegetarian/Gluten free: You can leave out the bacon to make it vegetarian, and it's already gluten free.
Nutrition Information:
Yield:
20Serving Size:
2 TablespoonsAmount Per Serving: Calories: 275Total Fat: 23gSaturated Fat: 13gTrans Fat: 0gUnsaturated Fat: 8gCholesterol: 65mgSodium: 330mgCarbohydrates: 4gFiber: 0gSugar: 1gProtein: 13g
Nutrition information is an estimate only, and is only for the cheese ball mummy. Does not include crackers, bread, carrots, etc. for dipping or spreading.

That is absolutely adorable! (If a mummy can be adorable.) It would certainly be the hit of any Halloween party. Very creative – well done! 🙂
So creative! I love it! 🙂 And the cheese sounds tasty, too.
lol…you was great!
Who needs to be a cake decorator when you can be a MUMMY decorator instead – way more impressive in my book. (Also impressive: your Thriller dancing! You’re such a natural zombie.)
I lovet this so creative! Was wondering if shredded mozzarella would work for the bandages?
Diana,
I think your cheese mummy borders upon the genius. I can’t even begin to tell you how happy it has made me.
xoM
I need to have you over for dinner soon 😉
I usually use my “dirty streak” technique to give my Christmas cookie frosting more depth, but I think it’s even more charming in the mummy! Glad to see this revamped with “real cheese”. 🙂
Hi! This looks great and I plan to make it for Halloween this year! Do you think it could be made the night before and will keep in the fridge overnight?
Hi. I’m making this now and was curious where the Italian parsley goes. I see it in the ingredient list, but not in the recipe directions.
I didn’t see in the recipe what to do with the parsley
Hi Janice, whoops, missed that in the instructions. It goes in the cheese ball with the other chopped ingredients. I’m updating the recipe and post today and will fix that. Thank you!
This cheese mummy looks adorable and sounds delicious. I think I would lightly toast the slivered almonds first and then chop them before adding them to the cheese mixture. Can you explain why on earth you would use “light” sour cream to a decadent cheesy dish like this? LOL. Is there an actual reason like textural or sweetness or something besides “cutting calories”? I found it very amusing. Now for a real question: if I choose to use half and half cream cheese and goat cheese do I cream them together first and split the mixture in half? Or do I follow the recipe as is and substitute the piping cheese for the goat cheese? It seems to me that mixing them together would make more sense, but I would like your opinion since you’re the cheese mummy expert. LOL. Thanks. Trudy
Hi Trudy! I use the light sour cream because it’s not as thick as regular. I find it mixes better. But you can use regular sour cream too. For the goat cheese, yes mix with the cream cheese. I’m updating the post and recipe today and will make sure to clarify those items!