
Homemade almond milk is fresh, satisfying, and surprisingly easy. You can even make it with a juicer! I first tried making my own almond milk from fresh almonds because I thought that it would be a fun recipe to teach in my cooking classes. Then I discovered that my baby can’t digest the dairy protein, so I have to go dairy free while breastfeeding. I’ve been drinking soy milk, but am starting to suspect that it might be having some negative effects on our bodies, and am currently switching to almond milk.
The problem with store bought almond milk (even organic), is that it contains additives and preservatives like carrageenan, and doesn’t have nearly as many health benefits as fresh almond milk. Fortunately, it’s not that difficult to make your own almond milk, you just need to have either a blender or a juicer.
I have been making my almond milk using the blender method, listed in the photo above. But I was eying my juicer yesterday, and wondered, why wouldn’t it work with almonds? Turns out, you can make almond milk in a juicer. Cue the choir singing the Hallelujah chorus! This has cut my prep time in half, because I no longer have to strain it myself, a much needed time saver for this breastfeeding, postpartum depressed, can’t seem to get the dishes washed mama.
If you don’t have a juicer, don’t worry. I’m going to walk you through how to make almond milk from raw almonds with step by step photos. It takes a little longer with the blender, but it’s still only about 10 minutes, and you can even do it while wearing your baby! Trust me, I know.
Before I get the photo tutorial, I want to make sure you’re informed a little bit about buying almonds in the United States. I was shocked to learn this a year ago! You want to use whole raw almonds to make your own almond milk, BUT there’s something a little bit tricky you should know. Raw almonds in the US are not actually raw. A law passed in 2007 requires all almonds grown and sold in the US to be pasteurized. Unfortunately, the FDA still allows these almonds to be called “raw” because they believe the essential characteristics of the almonds are unchanged.
There are two ways of processing the almonds. One is a gas (PPO) that is believed to possibly be carcinogenic and really kind of takes away the whole point of making your own almond milk for avoiding unnatural additives. The other pasteurization process is steam. The only way to know the difference is that the almonds treated with PPO can NOT be labeled organic. So I choose to buy organic raw almonds.
Of course, this presents the dilemma of expense. Organic products do tend to cost more, and I find that organic almonds tend to be $1 an ounce on line and in grocery stores. Fortunately, my favorite food co-op, Azure Standard, has some amazing deals on almonds. You can get 2 lbs of organic raw California almonds for about $20. These almonds are steam treated, but the inside is not heated as high as the outside so the almonds are still able to sprout. For about the same cost you can also get truly raw almonds from Spain, that are not pasteurized at all.

Soaking the Almonds
You’re going to get about two cups of milk for every cup of almonds you make. I suggest doing 1-2 cups of almonds at a time, as you need to use the milk up within a couple days.
Place the almonds in a large bowl and add at least three times the amount of water (so three cups of water for every cup of almonds). Soak the almonds overnight, or up to two days. Some people say four days if you change the water, but I find that if I go that long, I tend to forget about them. Sleep deprived nursing mama brain here. If you can go the entire 2 days, I recommend it. You will get a richer creamier almond milk.
Juicing the Almonds
For both the blender and juicer method, you will need to drain the almonds, then add some fresh water. You want a 2:1 ratio of water to almonds. So if you started with one cup of almonds, you’ll want to add two cups of water to your drained almonds.
If you’re using a juicer, turn on the juicer, then use a ladle to spoon almonds and water into the juicer. The almond meal will be extracted, just like pulp from your produce, and the milk will come out of the juicer spout. (If you don’t have a pulp extracting juicer, I suggest the blender method)
Now you can skip ahead to storing the milk.

Blending the Almonds
If you’re using a blender, simply put the almonds and water into your blender pitcher and blend on high speed. Continue blending until the almonds are completely pulverized and everything looks white and frothy in your blender.

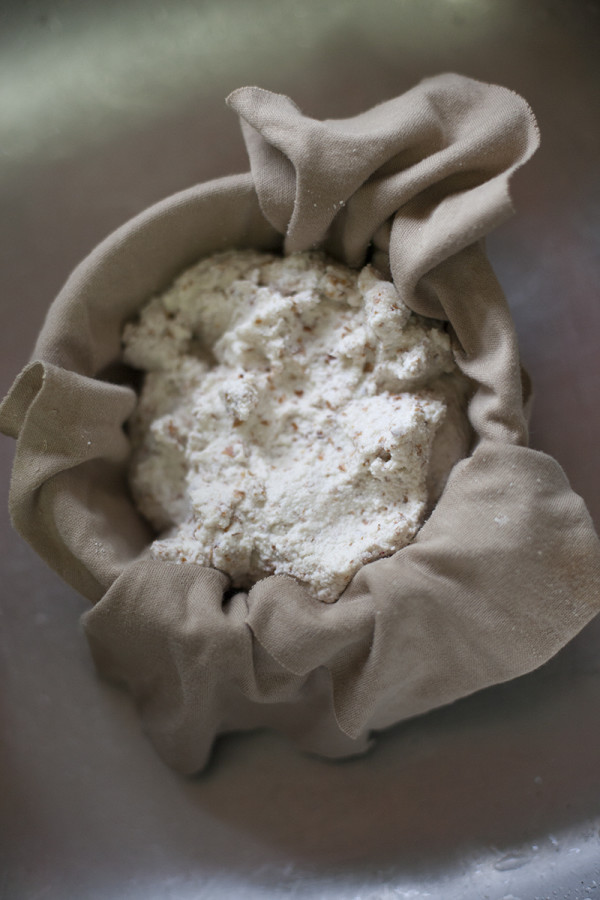
Straining the Almonds
This is the extra step that the juicer eliminates, but it’s not very difficult. You simply need a large square (about 18 inches) of clean fabric, or a nut bag. I like to use a square of muslin I have left over from a sewing project. Now that I’m making homemade almond milk so often though, I have decided to sew my own nut bag. The advantage of the nut bag is that you can just pour everything in and squeeze the milk out without having to worry about spilling.
If you are using a piece of fabric, place a strainer over a large bowl, and drape your fabric over the strainer. Slowly pour the blended almonds into the fabric, being careful to keep everything in the fabric. Once you’ve poured it all in, gather up the edges of the fabric and begin twisting them together and wringing the milk out of the almonds. Twist tighter and tighter, squeezing the almond meal, until you can’t extract any more liquid.
Don’t toss that meal! Stick it in your freezer to save for baking and cooking. I’ll have some tips for using leftover almond meal in my next post.
Storing Homemade Almond Milk
I like to pour my fresh almond milk into large mason jars, but you can use any jar, milk bottle, or glass pitcher you’d like. Homemade almond milk will keep two, maybe three days in the refrigerator.
Flavoring Homemade Almond Milk
Almond milk is already slightly sweet, thanks to the lovely sweetness of fresh almonds. If you’d like it a little sweeter, like the sweetened version you’d buy in the store, you can add some honey or maple syrup. Here are some flavor additions for one cup of almond milk. You can mix any, or all three of them. Play around to find what flavor you like best.
Sweetened Homemade Almond Milk Recipe: Add 1/2 teaspoon of real maple syrup or melted honey (the honey mixes in more easily if it’s slightly heated first) to one cup of almond milk.
Homemade Vanilla Almond Milk Recipe: Add 1/2 teaspoon of real vanilla extract to one cup of almond milk.
Homemade Chocolate Almond Milk Recipe: Place 1 teaspoon of cocoa powder into your glass or jar. Pour in a Tablespoon of fresh almond milk and stir well until the powder is completely mixed into the milk. Add the rest of your cup of almond milk and stir to combine.
I now make almond milk three to four times a week during breakfast. It’s a part of my breakfast routine, and Corban loves watching the almonds blend into milk. Because the almond milk is full of protein and other nutrients like omega 3 fatty acids, vitamin E, calcium, and potassium, it’s a really healthy milk alternative for breastfeeding mamas. Plus it just tastes good!
Do you have any additional ideas for naturally flavored almond milk?
Homemade Almond Milk Recipe in a Juicer or Blender

It's so easy to make homemade almond milk, and much better for you than the store bought variety. Here are instructions to make your own fresh almond milk using a blender or juicer. See the blog post for more mini recipes for naturally flavored almond milk.
Ingredients
- 1 cup raw almonds
- water
Instructions
- Soak the almonds in a large bowl in three cups of water. Let soak at least eight hours and up to about 48 hours.
- Drain the almonds.
- If using a juicer (make sure it's a pulp extracting juicer), mix almonds with two cups of water. Turn juicer on and ladle almonds and water into the juicer. Skip to storing the fresh almond milk.
- If using a blender, place almonds and two cups water in the pitcher of the blender. Blend on high until almonds are completely pulverized.
- Strain the almonds in an 18 inch square piece of muslin, or a nut bag. Squeeze well until you can't extract any more milk.
- Freeze the almond meal that's leftover for baking and cooking.
- Store fresh almond milk in a glass jar or pitcher in your fridge. Use within 2-3 days.
Notes
Approximate cost/serving: I'll be honest, this isn't cheap! I get about 6 cups of almonds in my 2 pound bag. That means it's $20 for 12 cups of homemade organic raw almond milk, or $1.66 per serving. BUT, if you save the almond meal and use it for baking, that cuts your cost per serving in half because you're getting a really useful, healthy byproduct. Then it comes out to about 83 cents per serving. You can cut the cost by not using organic almonds, but it won't be nearly as good for you.
Vegetarian/Gluten Free: Yes to both and vegan too.
Nutrition Information:
Yield:
2Serving Size:
2 ServingsAmount Per Serving: Calories: 40Sodium: 5mgCarbohydrates: 1gFiber: 1gProtein: 1g

I just came across this post today and I am excited by the possibility of using a juicer for almond milk! However, I’m unsure about the type of juicer recommended. I have a centrifugal juicer that throws the pulp aside, but I’m not certain that’s the same as a pulp EXTRACTING juicer…is a masticating juicer the appropriate type?
I think that would work. I don’t have masticating juicer so I’m not certain. The key is that the juicer separates the pulp for you, otherwise you may as well just use a blender and strain it yourself. I’d suggest giving it a try! If you do, please leave a comment and let me know how it goes. Also, if you make it in the juicer, you can juice some strawberries or mango too for flavored almond milk!
Cool. Which is creamier in your opinion ? Blender or juicer ?? I want this for my coffee / tea. 🙂
I found the blender to be creamier.