I’ve never done a gingerbread house before, this was the first, and a lot of fun! Making your own gingerbread house is a bit of work. Some of the advantages are
1. It’s typically cheaper, especially if you already have the ingredients
2. You can create your own design
3. It makes your apartment smell AMAZING! And heats it up too 🙂
Some of the disadvantages:
1. It takes longer
2. It can be harder to fit together if the shape changes as it’s cooking
3. We made ours so big that it took a lot more time to decorate
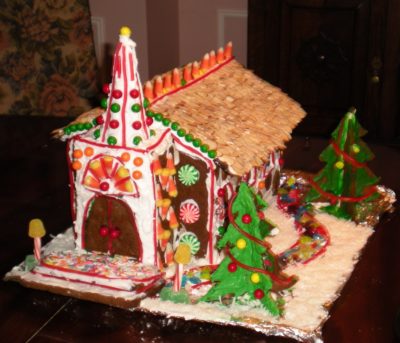
Hopefully this post can help you figure out if you want to do yours from scratch or not. We definitely think it was worth making our own just to be creative. It was Eric’s idea to do a chapel. We live next door to our church and are getting ready to kick off a new ministry there next month, so it seemed appropriate.
The first step was finding a recipe and a pattern. I probably could have designed my own, but wanted to play it safe for my first gingerbread house. I found a pattern here, it’s tough to see because of the size, but it give me the idea to be able to draw it out myself with a ruler.
Then came the recipe, I found tons of different recipes for making the gingerbread, but this one was the simplest and used the fewest ingredients (which translated to less cost!) By the way, the recipe says you can sub corn syrup for the molasses but we avoid that stuff whenever possible.
Gingerbread Cookie Dough
Ingredients
1 cup vegetable shortening
1 cup sugar
1 cup dark molasses
1 teaspoon baking soda
1/2 teaspoon salt
1 teaspoon ginger
1 teaspoon nutmeg
1 teaspoon cinnamon
4 cups of flour
Instructions
Melt the first three items in a pot over low heat.
Remove from heat and stir in baking soda through cinnamon.
Then stir in flour, 1 cup at a time. (You may have to enlist the help of an electric mixer on the last cup as the dough gets quite thick and hard to stir. Split the dough into manageable balls, wrapping excess in plastic wrap. Roll out, cut pieces, bake at 375 for 6-12 minutes.
(I forgot to melt the first three ingredients before putting them in the bowl, so I just put my mixing bowl on a hot burner and stirred until it was all melted. Also, I used the electric mixer the whole time, and just tore off a little to roll out each piece, rather than balling it up)
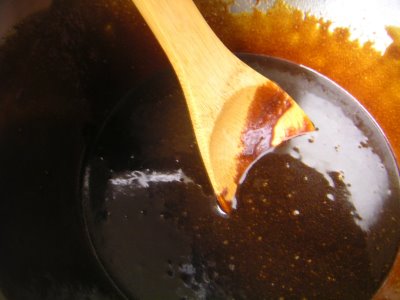 Shortening, sugar and molasses look like something our of Willy Wonka’s factory

The pattern for our side walls and roof
I drew all of my pattern pieces and then cut them out. I rolled out the dough a little bigger than my pattern piece. I used two books the same thickness to rest my rolling pin handles on to try and roll the dough out evenly. The I lay the pattern piece on top of the dough and used a table knife to cut around it. For the windows I had another piece the window shape and cut around that then pulled the pieces out. The pattern pieces got SO oily, it was pretty funny, they went from computer paper to looking like waxed paper. We did the baking 2 nights before the competition.

Side wall with window cut outs
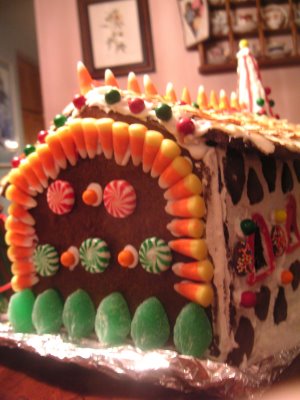
We crushed up a bunch of jolly ranchers, and melted some of them for the stained glass windows. I just placed some in 6 clumps on a foil covered baking sheet, then popped them in the oven. The first time I tried I didn’t watch them and 3 minutes later they were brown glass. So the second time we sat and watched it and took them out when they were melted.

Egg White Icing
3 egg whites
1/2 teaspoon cream of tartar
1 (16 oz box) confectioners powdered sugar
In a large bowl combine all ingredients. Beat 7 minutes with an electric mixer until smooth and thick.. A good test is when a knife blade drawn through the icing leave a clean cut. Store in a tightly sealed container if you are not using it right away.
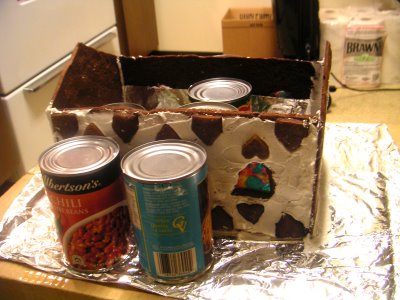
Our base got sturdy very quickly but we still let it dry overnight, and put the roof, doors and steps on the next morning. (the contest was in the afternoon) Canned goods work really well for supporting your base while it dries. Eric said one day we’ll get out a can of beans and wonder why it has hard white stuff on it!

Notice how Eric covered our baking sheet in foil. We were so glad he did that when I realized our house needed to be back further to fit the doors and steps on. we just moved the foil and it worked perfectly. Once everything was put together and solid, we were ready to decorate.

As I said in my last post, Eric did the almond roof and did a really impressive job. He put a line of frosting along the bottom of the roof, then placed slivered almonds on it. He continued repeating this up the roof, overlapping the almonds. The steeple is an ice cream cone covered in frosting. I made a gingerbread cross for it but forgot it when we were decorating.

Trees are surprisingly easy to make. I just drew an outline of a tree on paper, cut it out and traced it to have two. Cut out two pieces per tree and give one a long notch from the bottom and one from the top. Test with your paper patterns to make sure the notches are the right length. Remember they have to be wide enough to fit over your cookie. Don’t attach your trees before decorating them. We did that to be safer for transporting to Eric’s parents, but they’re much easier to frost and decorate horizontal.
You can figure out the gumdrop lamp, just break the curve off of a mini candy cane. Coconut sprinkled onto white frosting makes great snow.
One thing we forgot was the back wall. By the time we got to it, we didn’t have a plan and were tired and hungry so we went minimalist. But I like the row of “bushes”.
Thanks for checking out our house, we really had a blast making it and it was such a fun family activity. Hope this post can help you decide if making a gingerbread house from scratch is right for you.

Wow. Amazing!
I don’t even dream of doing such a project.
Oh good information. I am entering a gingerbread ship competition this month, and will use your recipe!
Aww thanks Nurit. It was definitely a project but such fun memories.
Sharon a ship sounds awesome. You’ll have to show me pictures. Do you have ideas?
That is one big and gorgeous gingerbread house, Diana! Very impressive and inspirational…the houses I made with the 2 year olds are much more, shall we say, avant garde. I like your pros and cons, too. Great post.
P.S. T*hanks for stopping by my blog today! Just a note: if you buy your nuts and chocolate from Trader Joe’s, and put the spread in small jars, it is a super inexpensive but lavish homemade gift.
WOW! Big kudos to you for taking on such a time consuming task!!! Looks like an all day job and looks great!