 I missed the December Daring Bakers’ Challenge. I was just too busy with the holidays, preparing for Life Hurts God Heals, and snowed in (which meant no shopping for ingredients). Money is really tight this month, but the ingredients were all things I have on hand, so I was looking forward to giving it a try. Then life got crazily overwhelming, and I almost didn’t make the deadline. But I decided that I hadn’t really had any “me” time, which is important, and so I would set aside a couple of hours to take on the challenge.
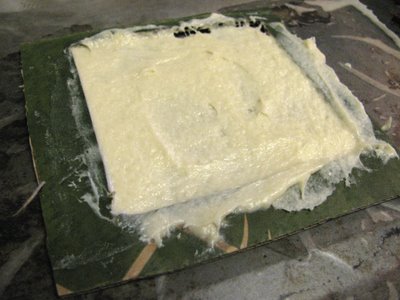
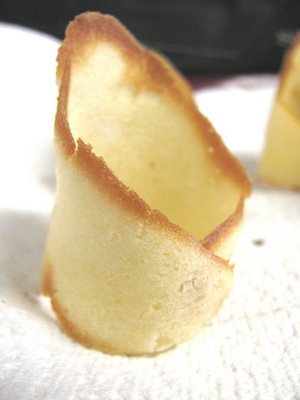
I did change a couple things from the recipes. I used coconut extract instead of vanilla (Yeah, I’ve been on a lime/mango/coconut kick lately). I also played around with colors, smearing colored dough in my stencil with the plain dough rather than piping it. Because I’m lazy, I didn’t sift my flour or sugar, and didn’t refrigerate my pan. I tended to find the dough was easier to spread when it was warm, but I did juggle several pans so that I had a cooler one to use. You can’t reuse one you just took out because it melts the butter immediately. If you want cool bowls like mine, use a square stencil and after it’s first bake, shape in a muffin pan and put back in the oven.

I thought these were pretty cool, but I don’t know if I’d make them again. They have so much butter that I felt sick after eating them! They smoke a lot because of the butter so I had to turn on a fan and open a window. All in all they look amazingly fancy, and taste good too. But they were a lot of work for just the two of us, I’d make them for a party that I wanted something special for though. They were a great challenge and definitely stretched my baking skills. I’ll just include the tuile recipes on this post, and try to follow up with what I filled them with. I did a mango and lime mousse for the sweet tuille, and a spicy crab and avocado filling for the savory.

Tuiles
20 small shapes Ingredients
1/4 cup softened butter (not melted but soft)
1/2 confectioner’s sugar
a dash of extract (I used coconut)
2 large egg whites (slightly whisked with a fork)
1/2 all purpose flour
food coloring of choice
waxed paper
Preheat oven to 350 degrees.
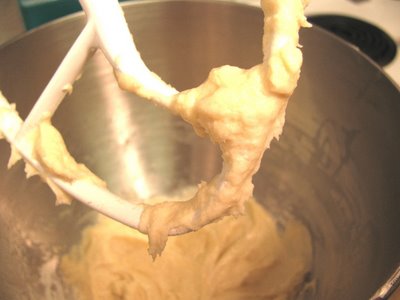
Use a stand mixer fitted with the paddle (low speed) and cream butter, sugar and vanilla to a paste. Keep stirring while you gradually add the egg whites. Continue to add the flour in small batches and stir to achieve a homogeneous and smooth batter/paste. Be careful to not overmix.
Cover the bowl with plastic wrap and chill in the fridge for at least 30 minutes to firm up. (This batter will keep in the fridge for up to a week, take it out 30 minutes before you plan to use it).
Line a baking sheet with parchment paper chill in the fridge for at least 15 minutes. This will help spread the batter more easily if using a stencil/cardboard template. Press the stencil on the baking sheet and use an off sided spatula to spread batter. Leave some room in between your shapes. Mix a small part of the batter with food coloring and a few drops of warm water until evenly colored. Use this colored batter in a paper piping bag and proceed to pipe decorations on the wings and body of the butterfly. (Or smear around your stencil like I did)
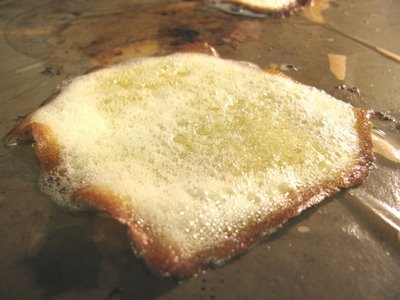
Bake for about 5-10 minutes or until the edges turn golden brown. Immediately release from bakingsheet and proceed to shape/bend the cookies in the desired shape. These cookies have to be shaped when still warm, so just do a few at a time. Or: place a bakingsheet toward the front of the warm oven, leaving the door half open. The warmth will keep the cookies malleable.

Savory tuile/cornet recipe
Ingredients
1/4 cup plus 3 tablespoons all purpose flour
1 tablespoon plus 1 teaspoon sugar
1 teaspoon kosher salt
8 tablespoons unsalted butter, softened but still cool to the touch
2 large egg whites, cold
In a medium bowl, mix together the flour, sugar and salt. In a separate bowl, whisk the softened butter until it is completely smooth and mayonnaise-like in texture. Using a stiff spatula or spoon, beat the egg whites into the dry ingredients until completely incorporated and smooth. Whisk in the softened butter by thirds, scraping the sides of the bowl as necessary and whisking until the batter is creamy and without any lumps. Transfer the batter to a smaller container, as it will be easier to work with (But I didn’t bother!).
Preheat the oven to 400 degrees F.
Make a 4-inch hollow circular stencil. Place Silpat on the counter (it is easier to work on the Silpat before it is put on the sheet pan). Place the stencil in one corner of the sheet and, holding the stencil flat against the Silpat, scoop some of the batter onto the back of an offset spatula and spread it in an even layer over the stencil. Then run the spatula over the entire stencil to remove any excess batter. After baking the first batch of cornets, you will be able to judge the correct thickness. You may need a little more or less batter to adjust the thickness of the cornets.
There should not be any holes in the batter. Lift the stencil and repeat the process to make as many rounds as you have molds or to fill the Silpat, leaving about 1 1/2 inches between the cornets. Sprinkle each cornet with a pinch of black sesame seeds.
Place the Silpat on a heavy baking sheet and bake for 4 to 6 minutes, or until the batter is set and you see it rippling from the heat. The cornets may have browned in some areas, but they will not be evenly browned at this point.
Open the oven door and place the baking sheet on the door.*** This will help keep the cornets warm as you roll them and prevent them from becoming too stiff to roll. Flip a cornet over on the sheet pan, sesame seed side down and place 4-1/2 inch cornet mold at the bottom of the round. If you are right-handed, you will want the pointed end on your left and the open end on your right. The tip of the mold should touch the lower left edge (at about 7 o’clock on a clock face) of the cornet.
Fold the bottom of the cornet and around the mold; it should remain on the sheet pan as you roll. Leave the cornet wrapped around the mold and continue to roll the cornets around molds; as you proceed, arrange the rolled cornets, seams side down, on the sheet pan so they lean against each other, to prevent from rolling.
When all the cornets are rolled, return them to the oven shelf, close the door, and bake for an additional 3 to 4 minutes to set the seams and color the cornets a golden brown. If the color is uneven, stand the cornets on end for a minute or so more, until the color is even. Remove the cornets from the oven and allow to cool just slightly, 30 seconds or so.
Gently remove the cornets from the molds and cool for several minutes on paper towels. Remove the Silpat from the baking sheet, wipe the excess butter from it, and allow it to cool down before spreading the next batch. Store the cornets for up to 2 days (for maximum flavor) in an airtight container.

Your savory tuile looks so delicious! I love the flavor combo!
I love your combo – great flavors!! Good job with the daring bakers! 🙂
Both versions look mighty scrumptious! Your tuiles look pretty!
Cheers,
Rosa
The coconut extract sounds like a fun change to the recipe. I agree that especially with the savory ones they are so buttery you don’t want to have much more than one.
Thanks so much everyone. I really enjoyed seeing what you came up with for the challenge.
Beautiful! You were quite ambitious!
Congrats on your photo going into foodspotting (so did mine!). Great effort and the choice of flavours what a tropical feast. Yes this was such a fun and creative challenge. Hope you enjoy this month’s DBers challenge.
Looks gorge!
Your tuiles look great! I wish I was creative enough to do a savory version. I did mine so last minute I just went with the first thing that popped into my brain. Thanks for stopping by my blog!
The fillings you made sound really appealing and your tuiles look very nice.
I like how you made your tuiles into little cups- Nice work!
I like the combo of flavours you chose for your savoury tuiles, sound so good!
Oh my–crab and avocado, sushi style, is the happiest thought ever. Genius!!! I love the idea of making sushi at your desk as well!!!
Your aavory tuiles look great! You were really creative with your shapes!
Crab and avocado.. mmmm..surely great minds think alike! 😉
Love what you did with your tuiles, including using later at work (the davory one). You clearly had the technique down and the flavors are great!