It’s so easy to make these beautiful stained glass Christmas cookies with Jolly Ranchers and a lovely holiday spice sugar cookie dough.

You can enjoy eating stained glass cookies as part of your holiday baking, share them in a cookie swap, or even hang them on your tree as Christmas ornaments!
This post contains affiliate links which means we get a small commission from anything you purchase through one of those links. Thanks for supporting our family business!
What are stained glass cookies?
In case you’re confused, stained glass cookies and church window cookies are two different types of Christmas cookies.
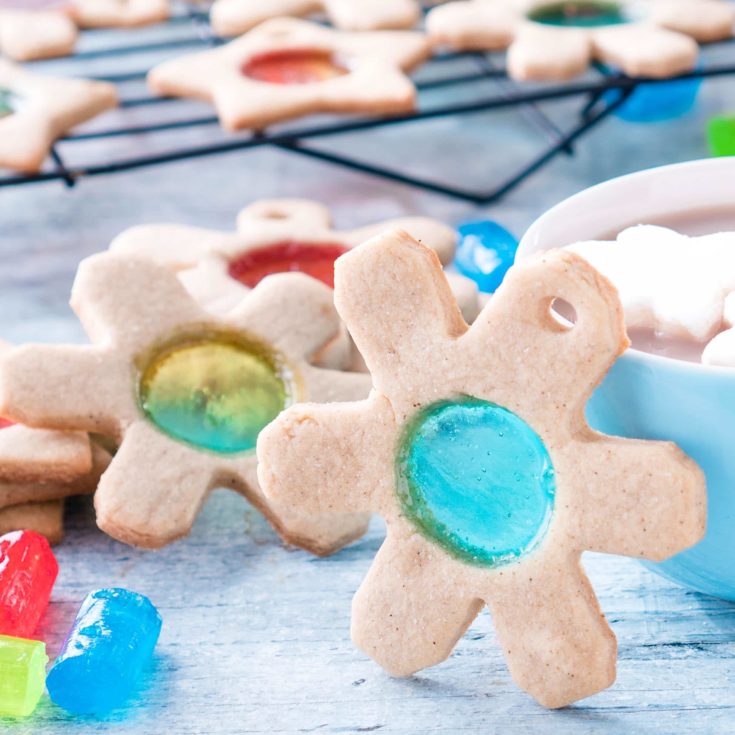
Stained glass cookies are a cut out cookie, like sugar cookies and gingerbread cookies. The center of the cookie is cut out with a smaller cookie cutter. The center is then filled with crushed colorful Jolly Rancher hard candies.

When the cookies are baked, the candies melt and create a beautiful see through and colorful “window” in the middle of the cookie.
Church window cookies are actually more of a fudge or candy. These no bake cookies are made into chocolate logs stuffed with colorful mini marshmallows.
When the logs are sliced into rounds, they give a fun colorful church window look. The chocolate between the marshmallows looks similar to the metal joints between panes of glass.
How do you make stained glass with Jolly Ranchers?
In case you just need the stained glass technique, let’s start with that. Then we will continue below to making stained glass cookies.
It’s so easy to make edible stained glass with Jolly Ranchers. I first tried this technique in 2008 when making a Gingerbread chapel.
Step 1: Divide Jolly Ranchers by color.
Step 2: Unwrap Jolly Ranchers and place same colors together in resealable plastic bags.
Step 3: Squeeze air out of bags and seal. Then crush candy with a meat mallet, rolling pin, or the bottom of a metal measuring cup.
Some candy shards will likely cut through the plastic, so be prepared for that to avoid sprinkling it all over your kitchen when you pick up the bag!
Step 4: Place crushed Jolly Ranchers onto parchment paper or foil lined baking sheet. You can do single colors, or do little bits of different colors next to each other.
If you’re making windows for a Gingerbread house or other edible building, you can simply make them as is and paste on the inside with frosting.
For stained glass cookies you will put the crushed candies in the center of the cut out cookie.
Step 5: Place in a 350 degree F oven for 5-10 minutes, until just melted. Watch carefully because it can go from melted to brown quickly!
Step 6: Let cool completely on baking sheet before moving.
Can you melt Lifesavers candy?
Lifesavers candy is a possible substitute for Jolly Ranchers, but I find the colors often look a bit muddy or opaque compared to Jolly Rancher stained glass.
What can I do with leftover hard candy?
Melted hard candy is perfect for edible art. If you have other types of hard candy that aren’t Jolly Ranchers, give them a try!
While Jolly Ranchers look best in stained glass cookies, I have also melted crushed lollipops, butterscotch, and peppermint candies.
You won’t get the same stained glass cookie appearance, but it will still be cute and taste great!
How to make stained glass cookies
I’m going to walk you through the ingredients, supplies, and steps for making stained glass cookies.

This sugar cookie dough is a little darker than a plain sugar cookie, and has a holiday spice flavor, thanks to brown sugar, cinnamon, all spice, and nutmeg.
If you want plain sugar cookies, swap the brown sugar for white sugar and skip the spices.
Stained glass cookie recipe ingredients
- 1 cup packed brown sugar
- 2⁄3 cup butter
- 1 small egg
- 2 1⁄2 cups all-purpose flour
- 1/2 teaspoon baking powder
- 1 teaspoon cinnamon
- 1/2 teaspoon allspice
- dash of nutmeg
- 2 teaspoons milk
- 4 dozen Jolly Ranchers
Stained glass cookies supplies
- Mixing bowl
- Wooden spoon
- Stand mixer (optional)
- Parchment paper
- Rolling pin
- Baking sheets
- Normal sized cookie cutters
- Small cookie cutters
- Chopstick or drinking straw
- Resealable plastic bags
- Meat mallet
- Thin Christmas ribbon
Instructions
- Put brown sugar and butter into a large bowl. Mix well with paddle attachment of stand mixer, or with a wooden spoon, until the mixture is smooth.
- Break the egg into to a small bowl and whisk well with a fork. Mix the beaten egg into the butter and sugar in the bowl, a little at a time.
- Mix flour with baking powder, then stir in cinnamon, allspice, and nutmeg.
- Sift the dry ingredients through a fine mesh strainer into the wet ingredients.
- Add the milk then mix everything together well, using a wooden spoon by hand or the paddle attachment of the stand mixer.
- Squeeze the dough into 2 balls.
- Place each ball of dough between 2 pieces of parchment paper and roll out 1/4 inch thick.
- Keep sheets of dough between parchment and place in the fridge on a baking sheet or cutting board. Chill 15 minutes.
- Use a larger cookie cutter to cut out your cookies. Remove scraps of dough from around the cookies and place cookies on parchment lined baking sheet.
- Then use smaller cookie cutter to cut out the center of the cookies. Use a toothpick to help remove the center if needed.
- If you want your cookies to be ornaments, make a hole in each cookie by pressing a drinking straw or the point of a chopstick through the dough where you want to hang it. Make sure there is a thick enough area of dough to not break.
- Divide candy by color into resealable baggies. Squeeze air out, close baggies, and hit with a meat mallet, rolling pin, or back of a metal measuring cup to crush candies.
- Carefully spoon crushed candies into the cut out in the cookies. Try using complimentary colors if mixing (like half blue and half green).
- Place baking sheet in fridge for 10 minutes while you preheat oven to 350°F.
- Squeeze the scraps of dough into a ball. Roll out the dough again between parchment paper and chill.
- Take sheet of prepped cookies from the fridge and put the cookie sheet on the middle rack of the oven.
- Bake the cookies at 350°F for 10-12 minutes, until candy is melted and cookie edges are just turning golden.
- Take the cookies out of the oven nd leave on the baking sheets until they have cooled completely, then remove carefully.
- You can now eat the cookies, or make them into ornaments by stringing a ribbon through each hole.
Pro baking tips to make the best stained glass cookies
Measure flour correctly: When baking, it’s important to measure your flour accurately. Fluff you flour with a spoon, then spoon it into your measuring cup until it is piled up high. Use the back of a table knife to scrape the excess flour off until the top is even with the top of the measuring cup.
Sift dry ingredients: After mixing your dry ingredients together, sift through a fine mesh strainer to make sure there are no lumps and all ingredients are evenly distributed.
Use a dough that doesn’t spread: If you want to use a different sugar cookie dough, make sure to stick with one that doesn’t spread as it bakes. You need the cookies to hold their shape.
Chill your dough: Chilling your dough helps the stained glass cookies hold their shape. Some people chill the dough before rolling. I prefer rolling it first and then chilling before cutting.
I also like to chill the cookies for about 15 minutes right before putting them in the oven because they can warm up quite a bit while you’re filling them with crushed Jolly Ranchers.

Crush Jolly Ranchers: Some people put whole Jolly Ranchers in their stained glass cookies. Other people pulverise them to a complete powder in a food processor. I find that the whole Jolly Ranchers can sometimes overflow, and powdered ones aren’t necessary.
Just crush the Jolly Ranchers in baggies and you’ll be fine. Some bigger chunks are okay, and some powder is okay.
Use parchment paper: Use parchment paper for rolling your dough to keep it from sticking. You also want to use parchment paper for baking your stained glass cookies. This will keep your cookies from burning and from making a big mess on your baking sheet. Silpat sheets work well too!
Don’t leave candy on the cookie dough: When filling the cookies, try not to get candy on the dough. This will help your cookies have a much cleaner look. If you do get any on the cookie dough, a pastry brush is the easiest way to get it off.
Poke the ribbon holes when dough has warmed slightly: Wait to poke the holes for hanging the cookies as ornaments until right before putting the prepped stained glass cookies back into the fridge. If the dough is too cold, it can crack when you poke your holes. If that happens, just press the cracked bit of dough gently back together with your fingers.
What cookie cutter shapes work for stained glass cookies?
Any shape of cookie cutter that has room for a center cut out will work. I like using snowflake, flower, and star shapes. If you have graduated cookie cutters like these, you can easily cut out the same center shape as an outer shape.

You can also use a set of small cookie cutters to cut different shapes out of whatever stained glass cookie shape you choose.
Can you freeze stained glass cookie dough?
The holiday spice sugar cookie dough can be frozen in plastic for up to 3 months.
How long do stained glass cookies last?
Keep your stained glass cookies in a sealed container for up to one week. Make sure it’s well sealed because humidity will cause the “stained glass” to become sticky.
Pin to save for later
Don’t lose the recipe! Save the image below on Pinterest, then leave a comment in the comments of the pin so we can see what you make. We love seeing your creations!

More Christmas Baking recipes


Printable recipe for stained glass cookies
Stained Glass Cookies with Jolly Ranchers
It's easy to make these beautiful stained glass Christmas cookies with Jolly Ranchers and a lovely holiday spice sugar cookie dough. Adapted with permission from Food.com
Ingredients
- 1 cup packed brown sugar
- 2⁄3 cup butter
- 1 small egg
- 2 1⁄2 cups all-purpose flour
- 1/2 teaspoon baking powder
- 1 teaspoon cinnamon
- 1/2 teaspoon allspice
- dash of nutmeg
- 2 teaspoons milk
- 4 dozen Jolly Ranchers
Instructions
- Put brown sugar and butter into a large bowl. Mix well with paddle attachment of stand mixer, or with a wooden spoon, until the mixture is smooth.
- Break the egg into to a small bowl and whisk well with a fork. Mix the beaten egg into the butter and sugar in the bowl, a little at a time.
- Mix flour with baking powder, then stir in cinnamon, allspice, and nutmeg.
- Sift the dry ingredients through a fine mesh strainer into the wet ingredients.
- Add the milk then mix everything together well, using a wooden spoon by hand or the paddle attachment of the stand mixer.
- Squeeze the dough into 2 balls.
- Place each ball of dough between 2 pieces of parchment paper and roll out 1/4 inch thick.
- Keep sheets of dough between parchment and place in the fridge on a baking sheet or cutting board. Chill 15 minutes.
- Use a larger cookie cutter to cut out your cookies. Remove scraps of dough from around the cookies and place cookies on parchment lined baking sheet.
- Then use smaller cookie cutter to cut out the center of the cookies. Use a toothpick to help remove the center if needed.
- If you want your cookies to be ornaments, make a hole in each cookie by pressing a drinking straw or the point of a chopstick through the dough where you want to hang it. Make sure there is a thick enough area of dough to not break.
- Divide candy by color into resealable baggies. Squeeze air out, close baggies, and hit with a meat mallet, rolling pin, or back of a metal measuring cup to crush candies.
- Carefully spoon crushed candies into the cut out in the cookies. Try using complimentary colors if mixing (like half blue and half green).
- Place baking sheet in fridge for 10 minutes while you preheat oven to 350°F.
- Squeeze the scraps of dough into a ball. Roll out the dough again between parchment paper and chill.
- Take sheet of prepped cookies from the fridge and put the cookie sheet on the middle rack of the oven.
- Bake the cookies at 350°F for 10-12 minutes, until candy is melted and cookie edges are just turning golden.
- Take the cookies out of the oven nd leave on the baking sheets until they have cooled completely, then remove carefully.
- You can now eat the cookies, or make them into ornaments by stringing a ribbon through each hole.
Nutrition Information:
Yield:
48Serving Size:
1Amount Per Serving: Calories: 68Total Fat: 3gSaturated Fat: 2gTrans Fat: 0gUnsaturated Fat: 1gCholesterol: 10mgSodium: 28mgCarbohydrates: 10gFiber: 0gSugar: 5gProtein: 1g
Nutrition information is an estimate only.

Wow my kids are going to love this! Such a creative idea